Create a New Permit to Work
Status: ![]() Request →
Request → ![]() Awaiting Validation
Awaiting Validation
Create a permit to work from scratch, complete its risk assessment, and submit it for validation.
When to use
Use this task when planned work needs a new permit and no existing permit, routine or work pack applies. For work that reuses an existing permit, see Copy an Existing Permit. For work generated from an approved routine, see Create a Permit from a Routine Permit.
Before you start — check before launching the task
- You hold the Permit Requester role (typical positions: PTW Preparator/Coordinator, Discipline Supervisor or Foreman, Electrical Authority, System/ICSS Supervisor, Production Supervisor).
- You know the site, the work location(s) and the system/equipment affected.
- You know whether the work is cold or hot (naked flame / non-naked flame), confined space entry or breaking containment.
- You know whether isolation (ICC) or inhibit (INH) certificates are required, and whether the work qualifies as high-risk (see Key Referentiel Rules).
- A permit number is created automatically when you open the form; the permit starts in Request state.
Step-by-step
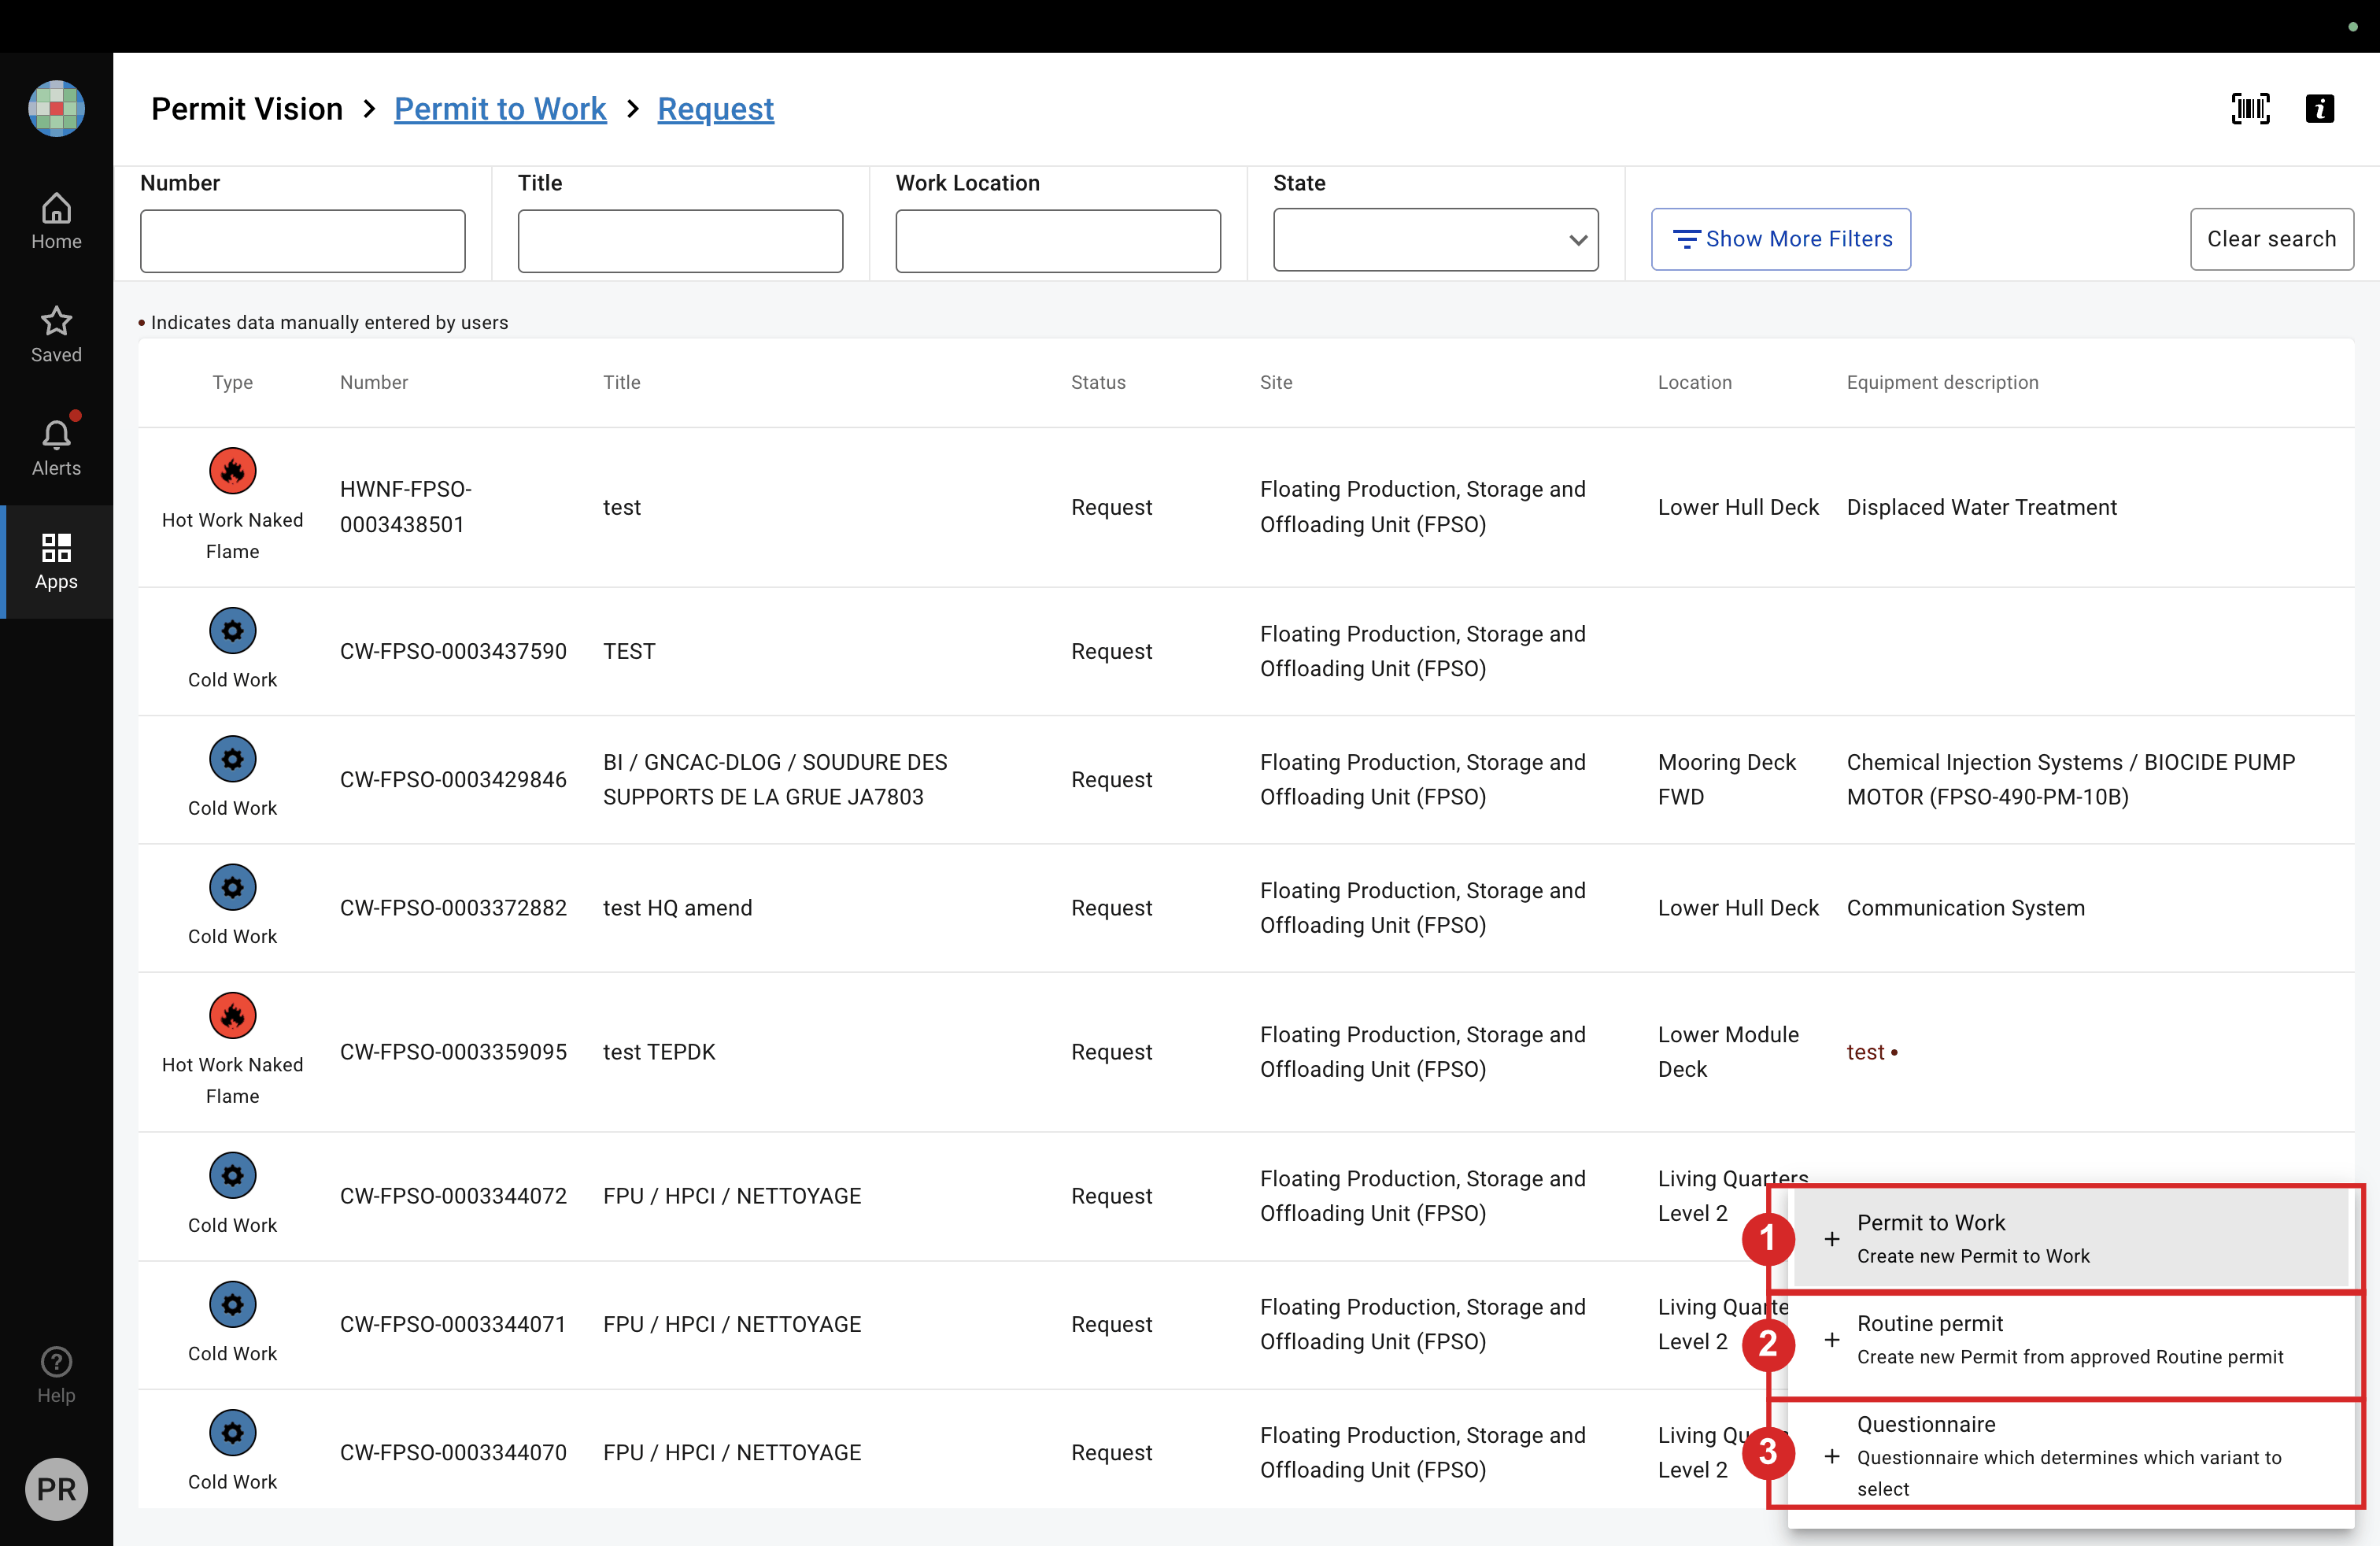
- In the Permit to Work list, open the create menu and select Permit to Work.
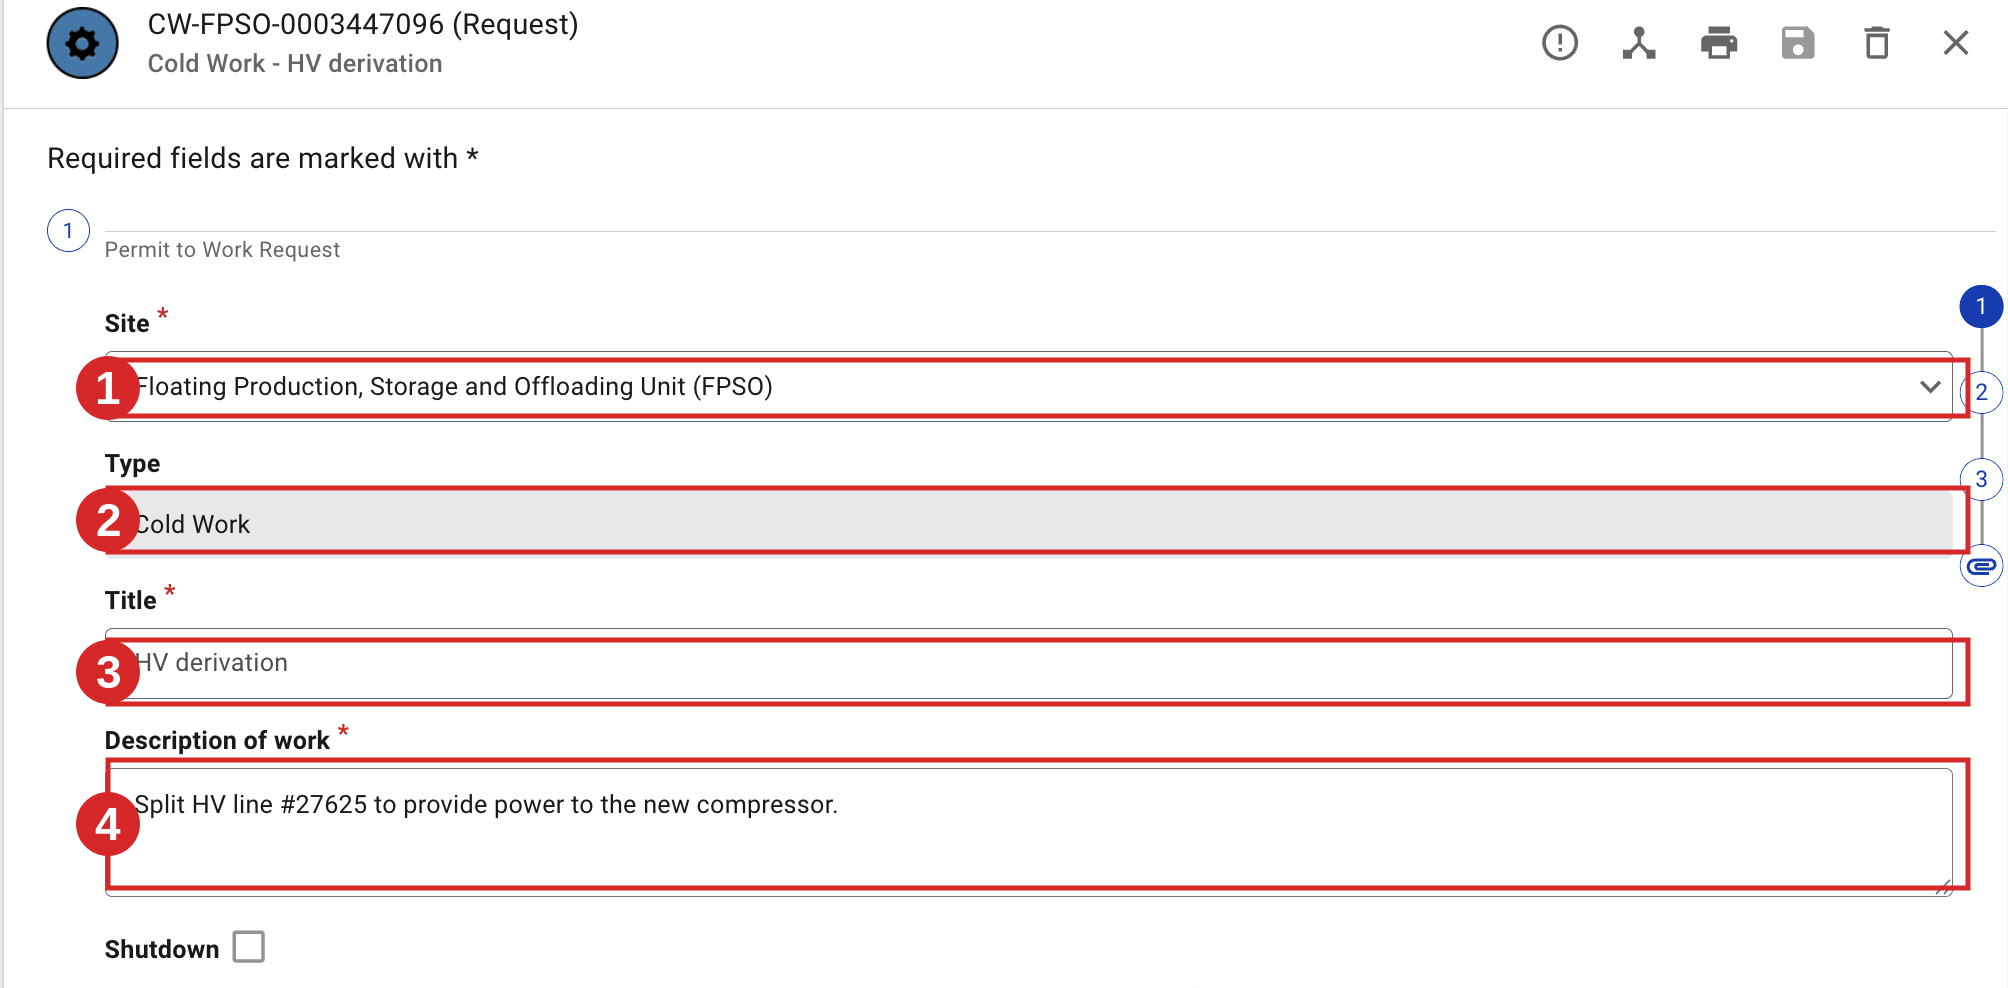
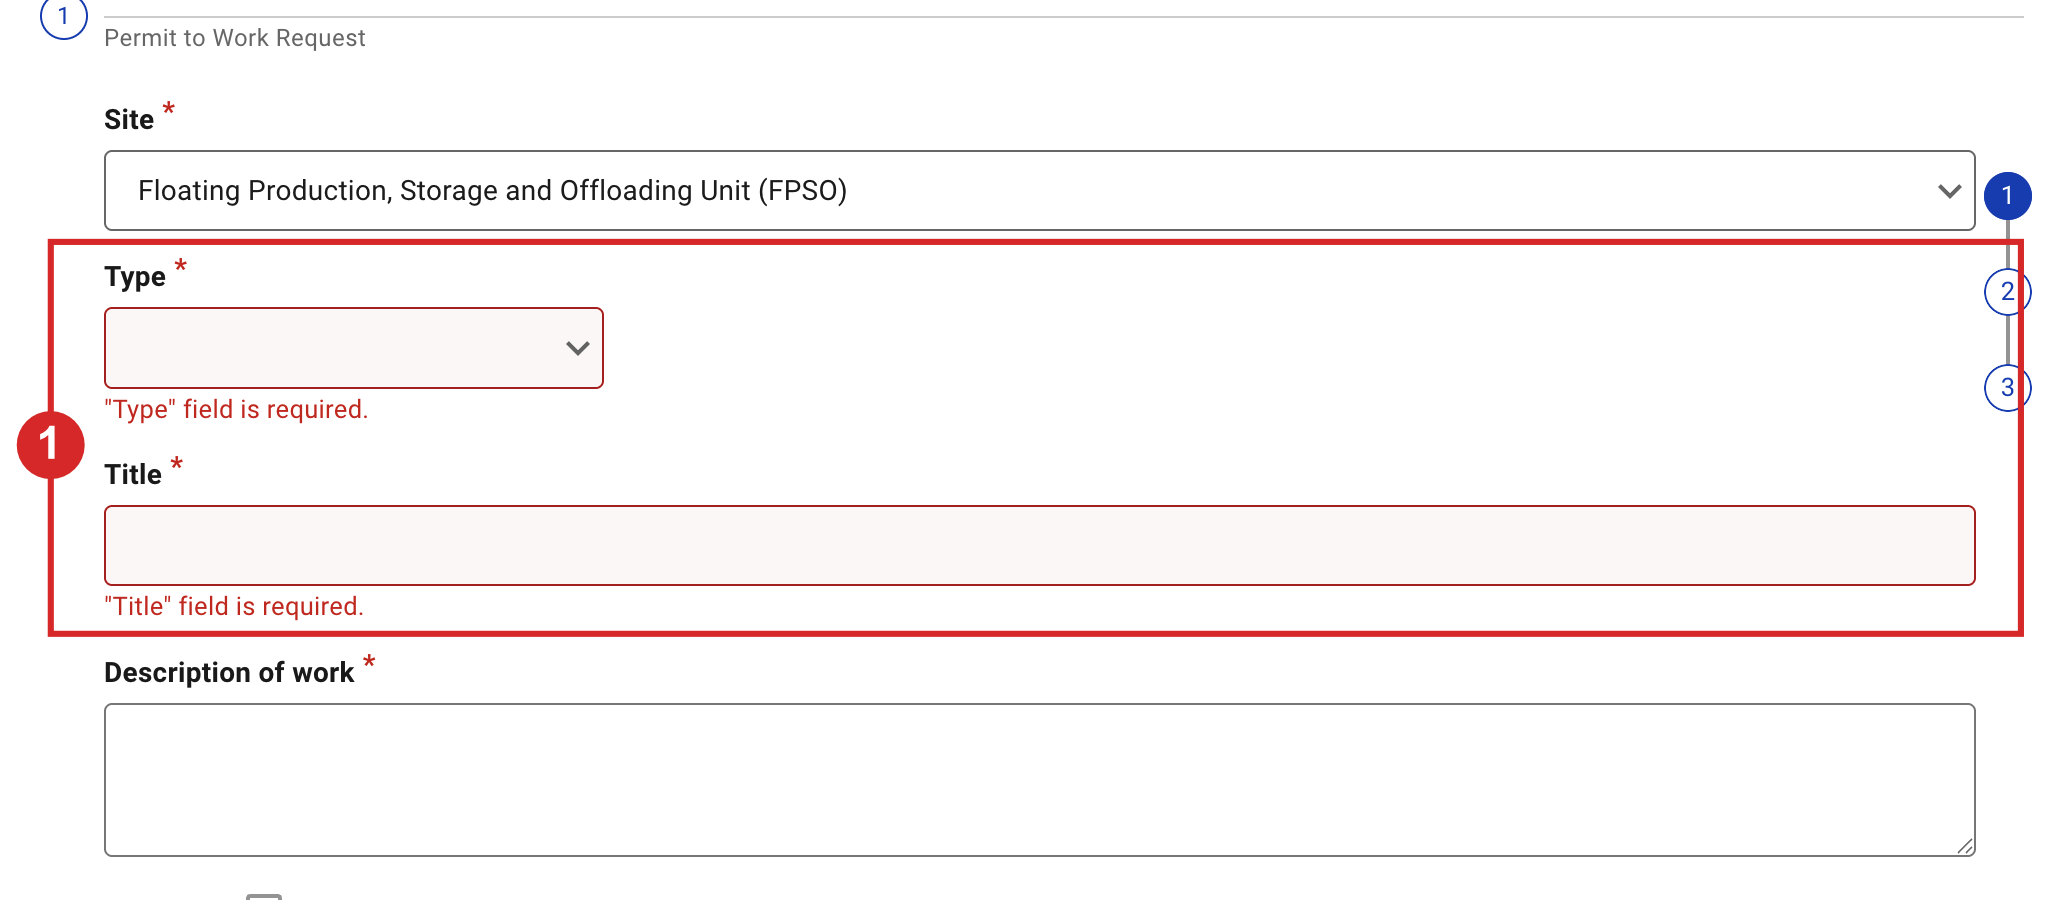
- Complete the general information: Site, Type, Title and Description of work. Required fields are marked with a red asterisk; if you leave one empty, the field turns red and shows a "field is required" message. Site and Type cannot be changed once the permit is saved, and the Type sets the permit's validity duration — choose them carefully.
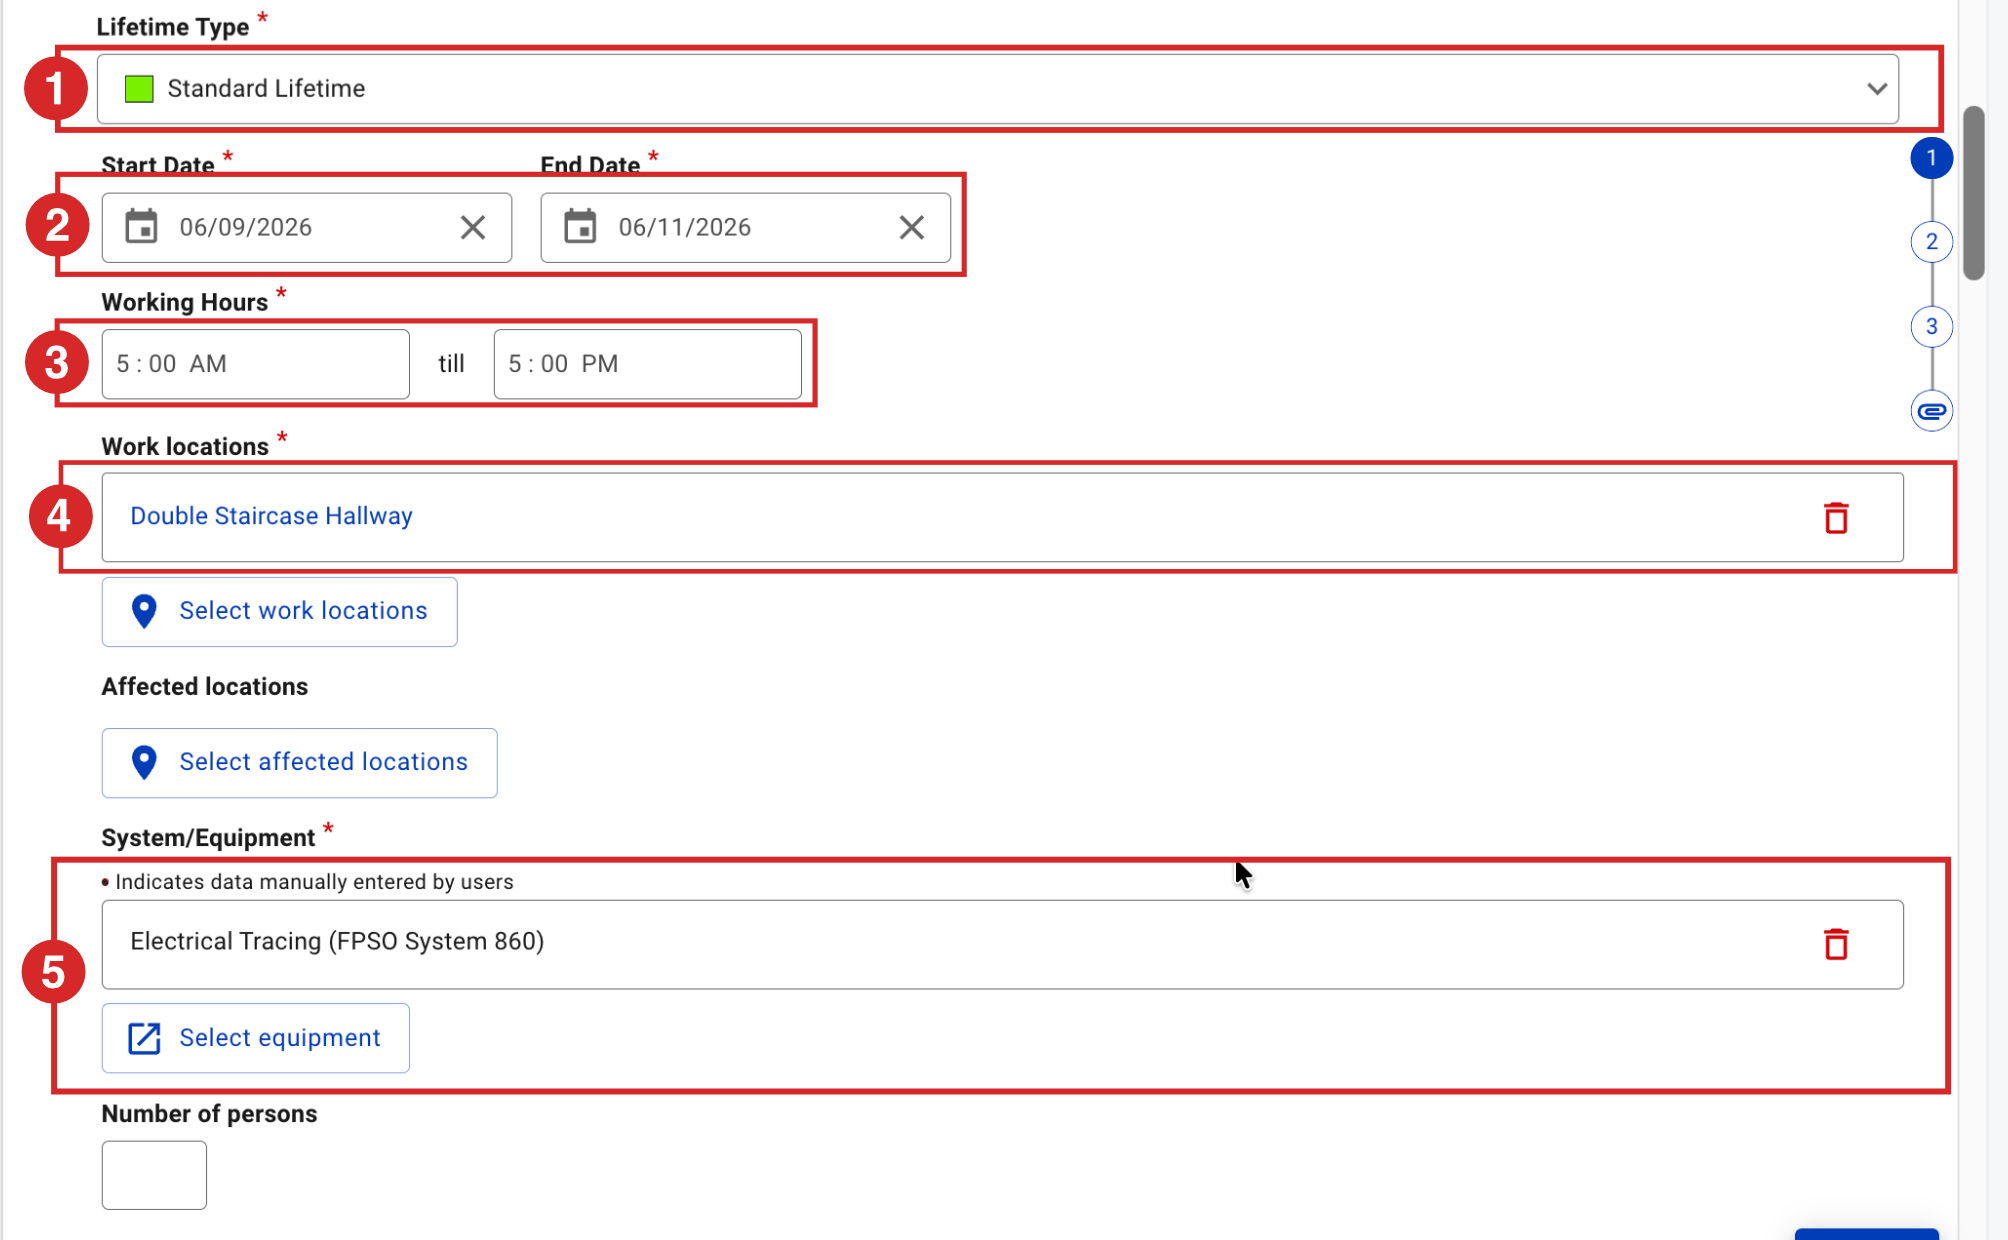
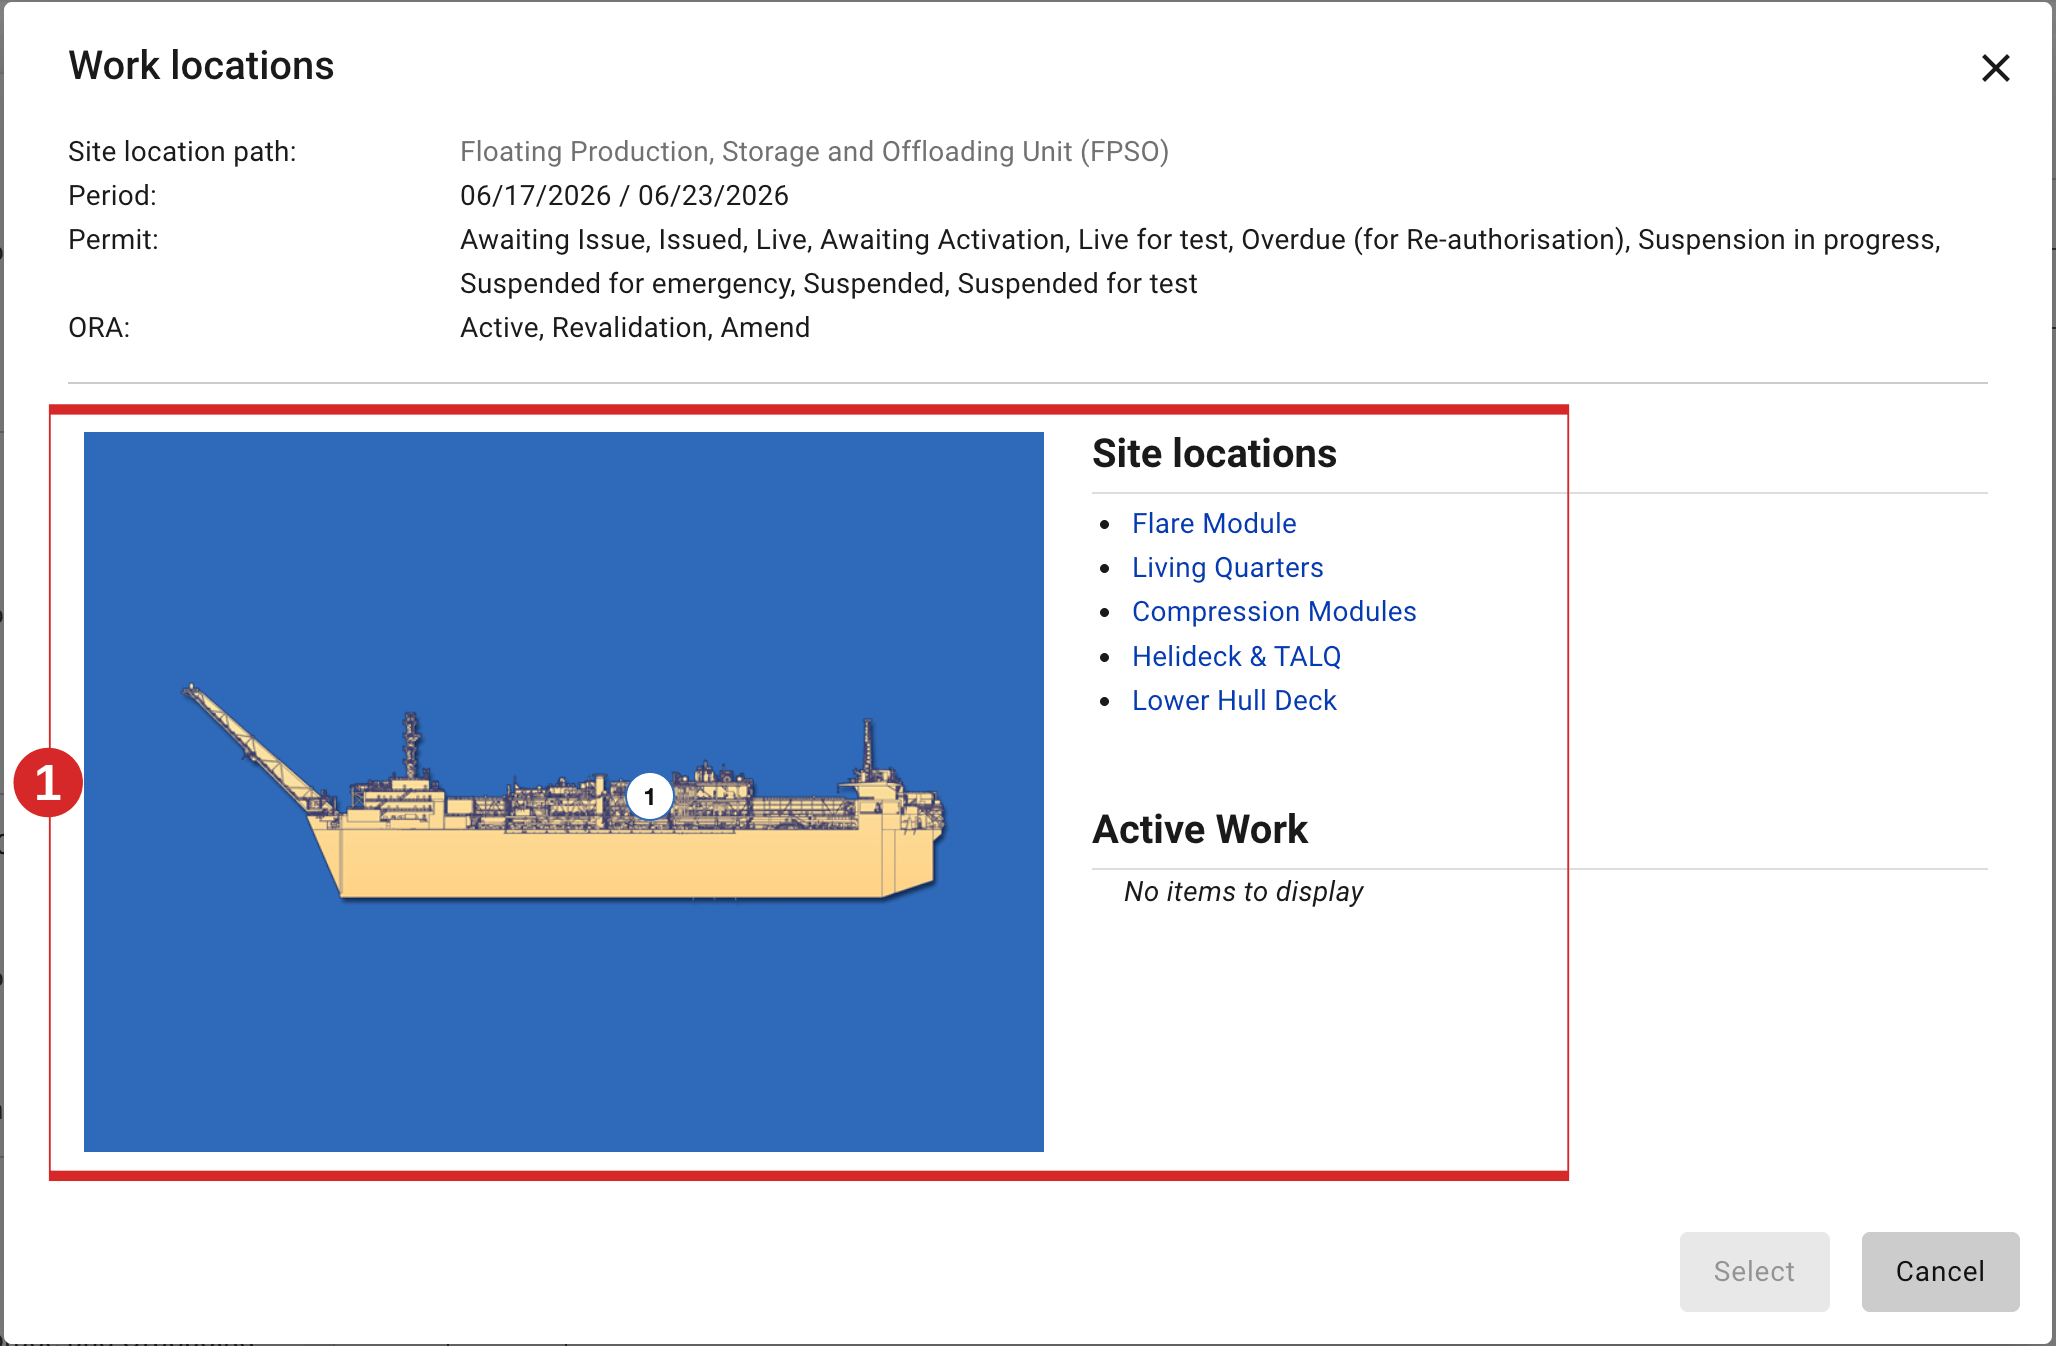
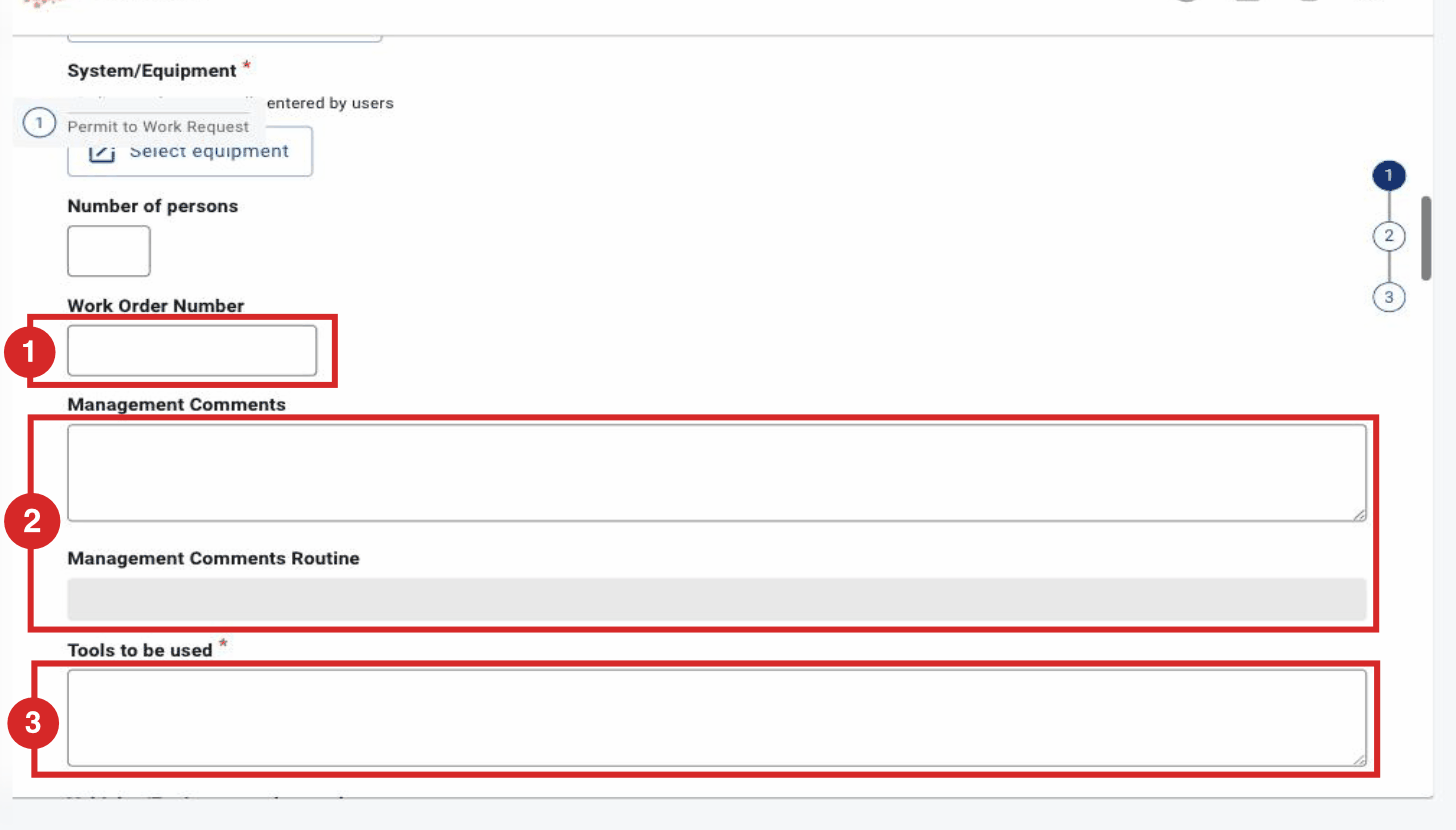
- Set the schedule and location: Lifetime Type (Extended is available only for Shutdown permits), Start Date, End Date, Working Hours, Work locations (open the site map and click a zone — on the map or in the Site locations list — to place the permit where the work happens), Affected locations (other zones affected by the work) and the Equipment on which the work is done. Optional fields: Work Order Number, Management Comments, Management Comments (Routine), Tools to be used and Vehicles / Equipment to be used. The Opportunity flag only tags the permit as OPP on the printed front page (no workflow rule attached).
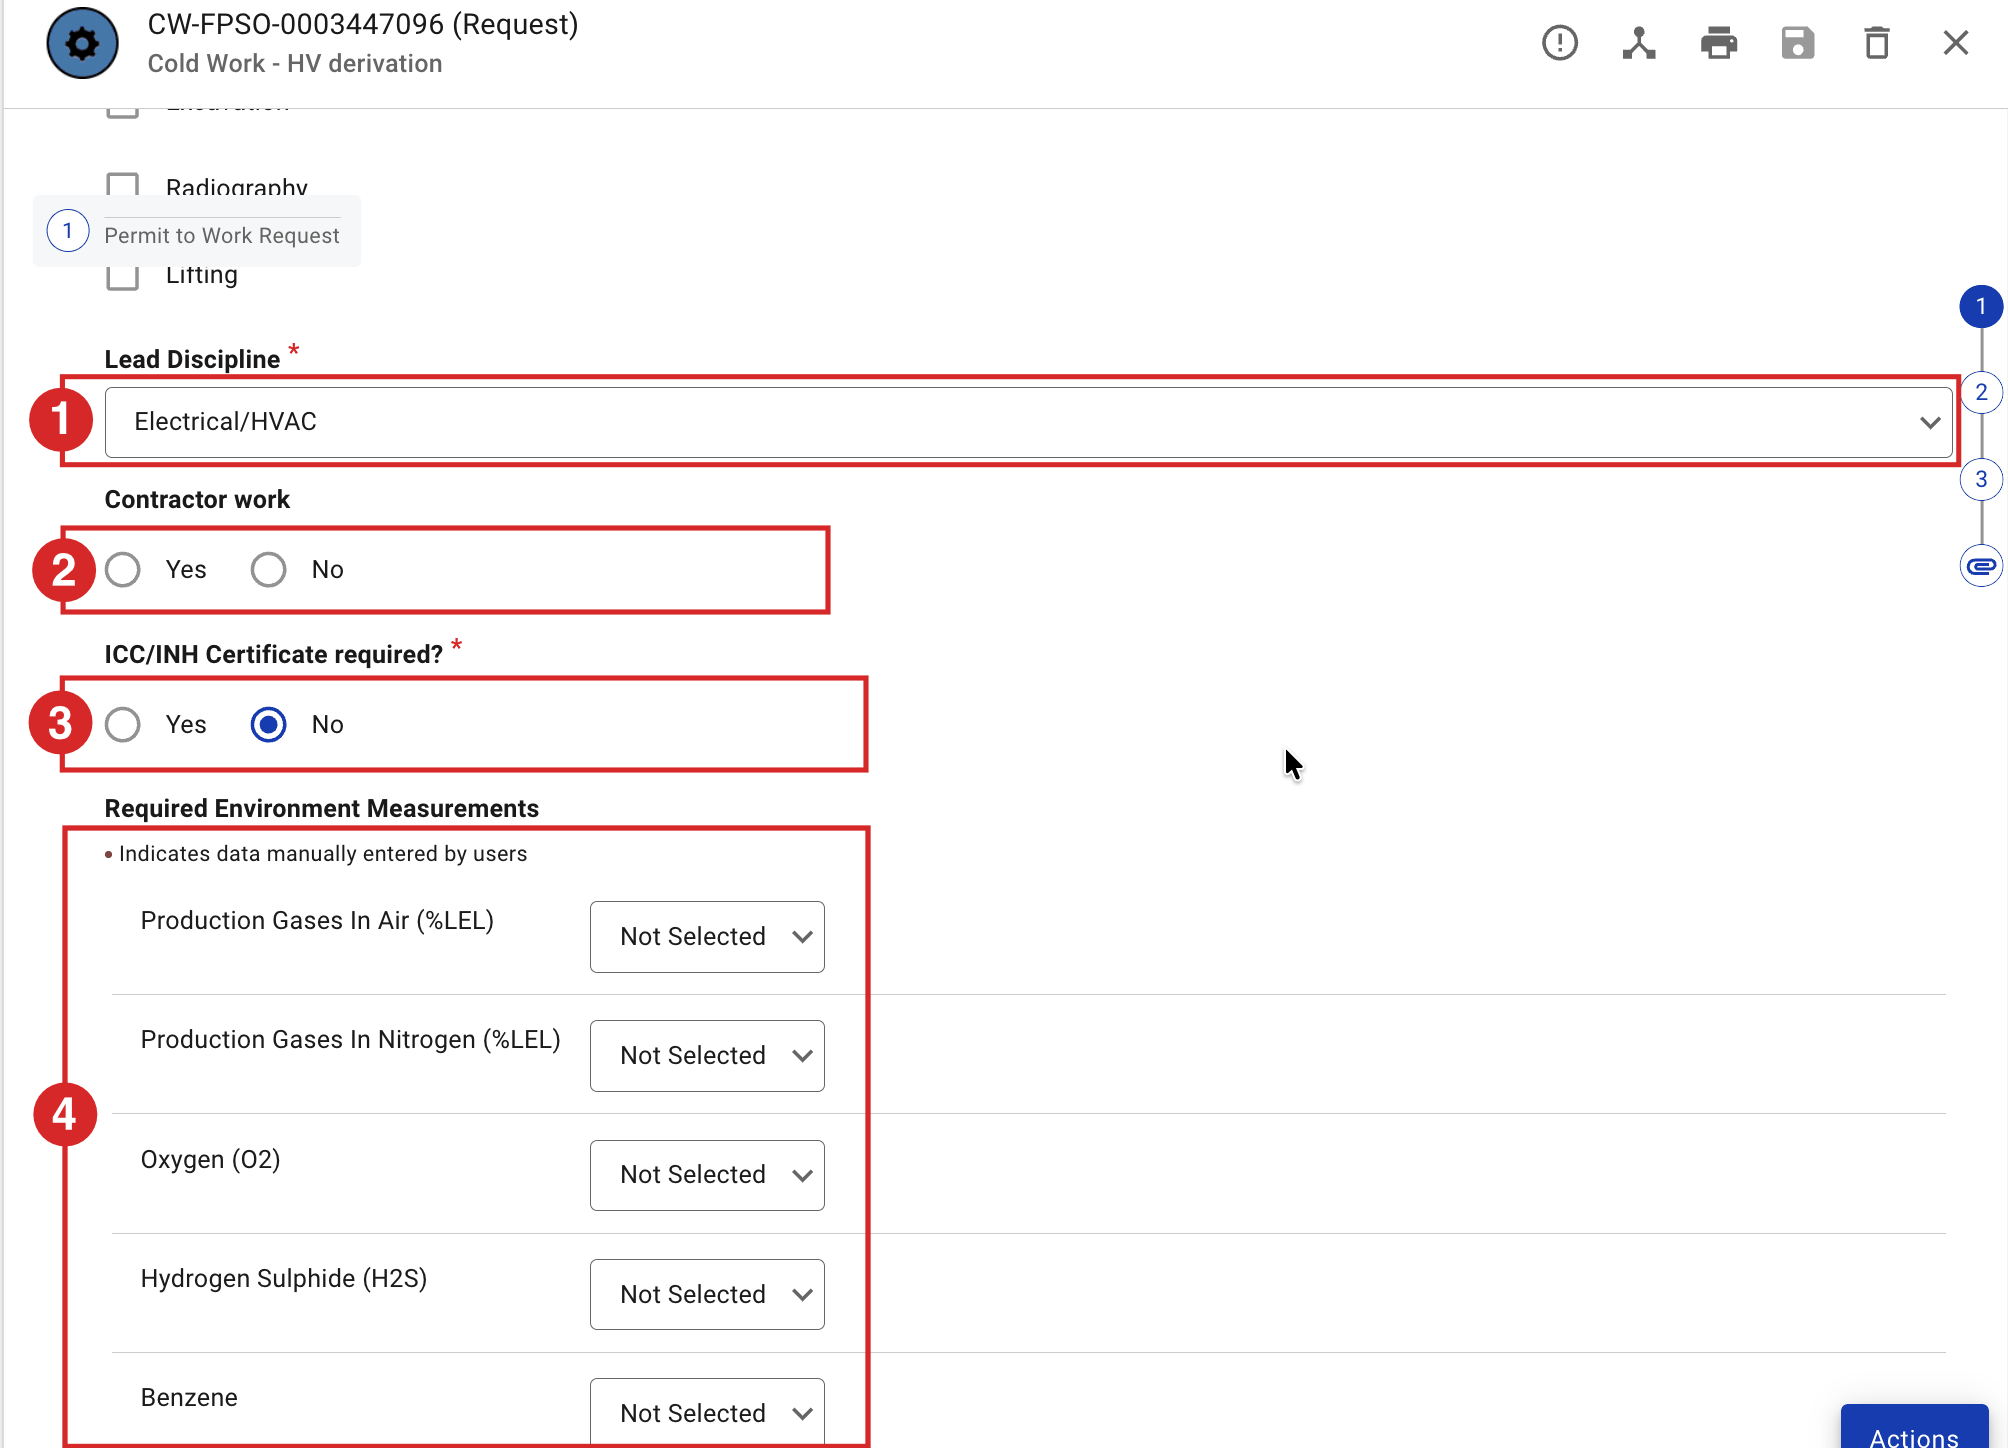
- Complete the certificates and measurements: Lead Discipline, Contractor work, and the ICC / INH requirement. Only the first question (is an ICC or an INH needed?) is shown; answering Yes reveals the rest — for an ICC, personal or full isolation; for an INH, full. For Required Environment Measurements, use + Add additional measure to add one manually and set its type: Initial (required before the permit can be issued — the PCA cannot issue if the value is not entered) or Subsequent (taken during the work).
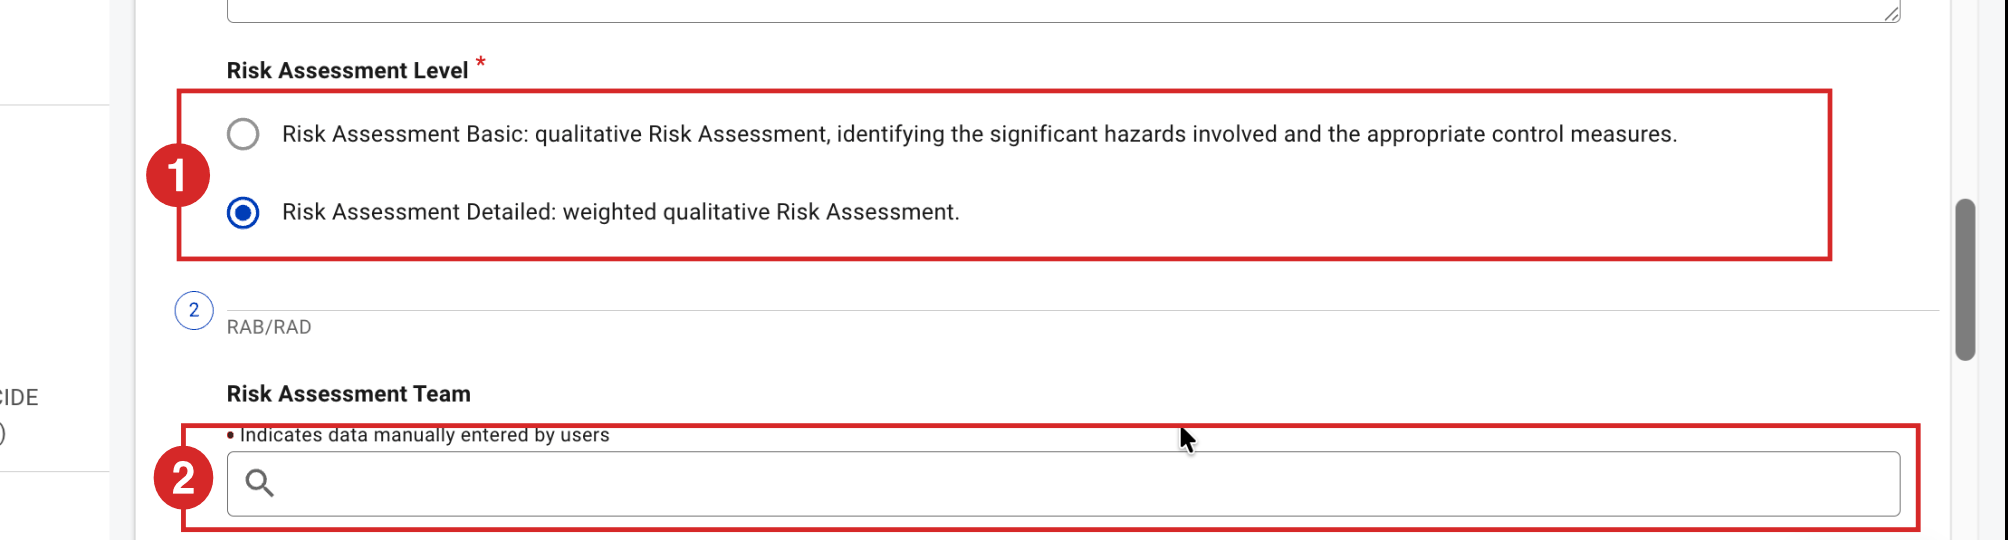
- Choose the Risk Assessment Level — Basic or Detailed — and, if needed, select the Risk Assessment Team. Each person added to the team must hold the Risk Assessor role to be selectable, and then confirms the assessment with their own signature.

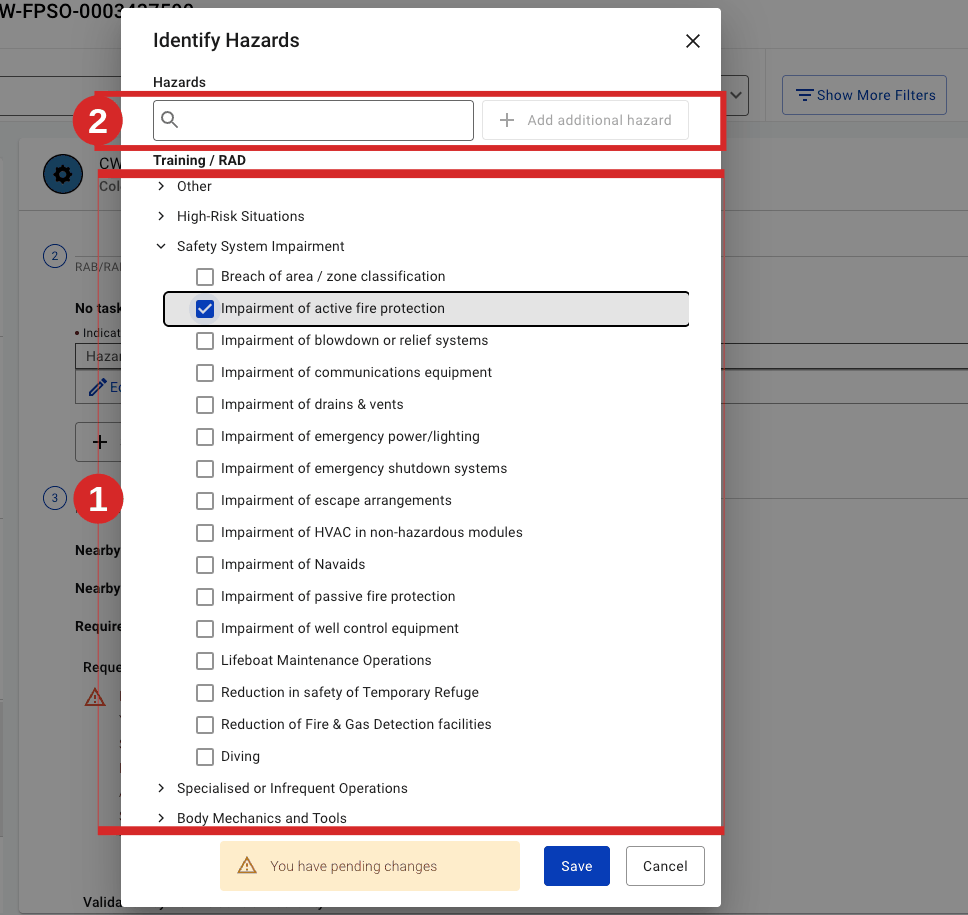
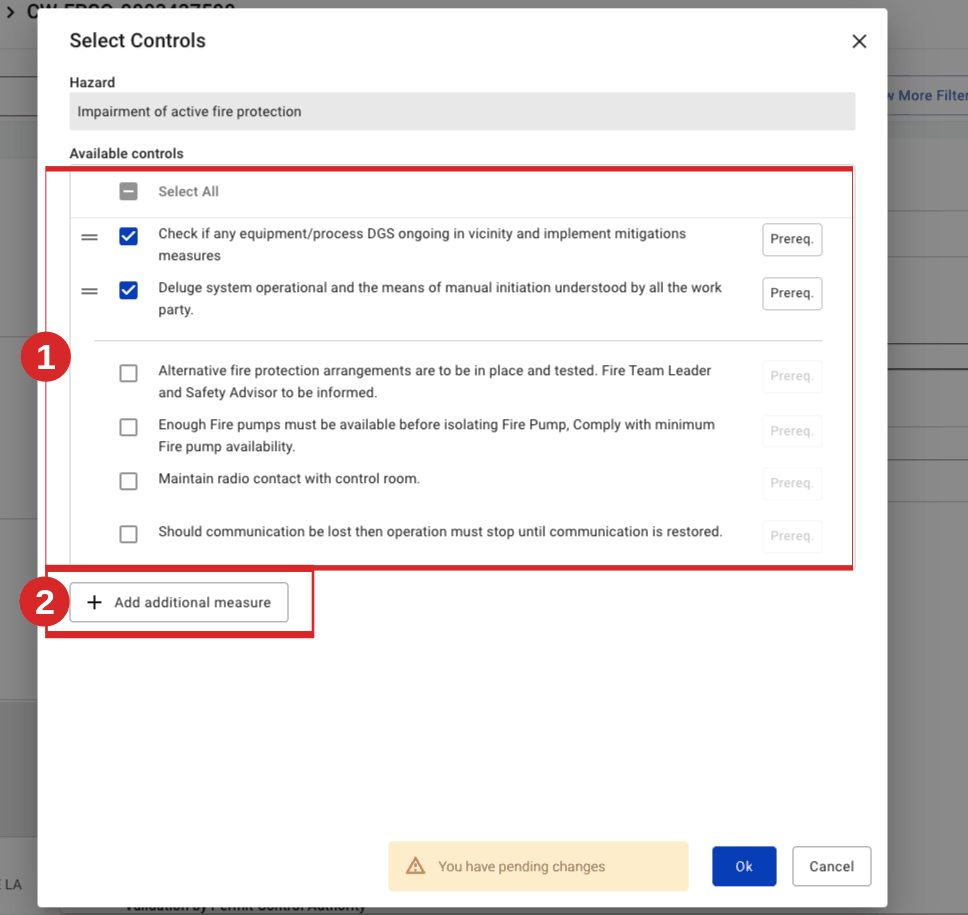
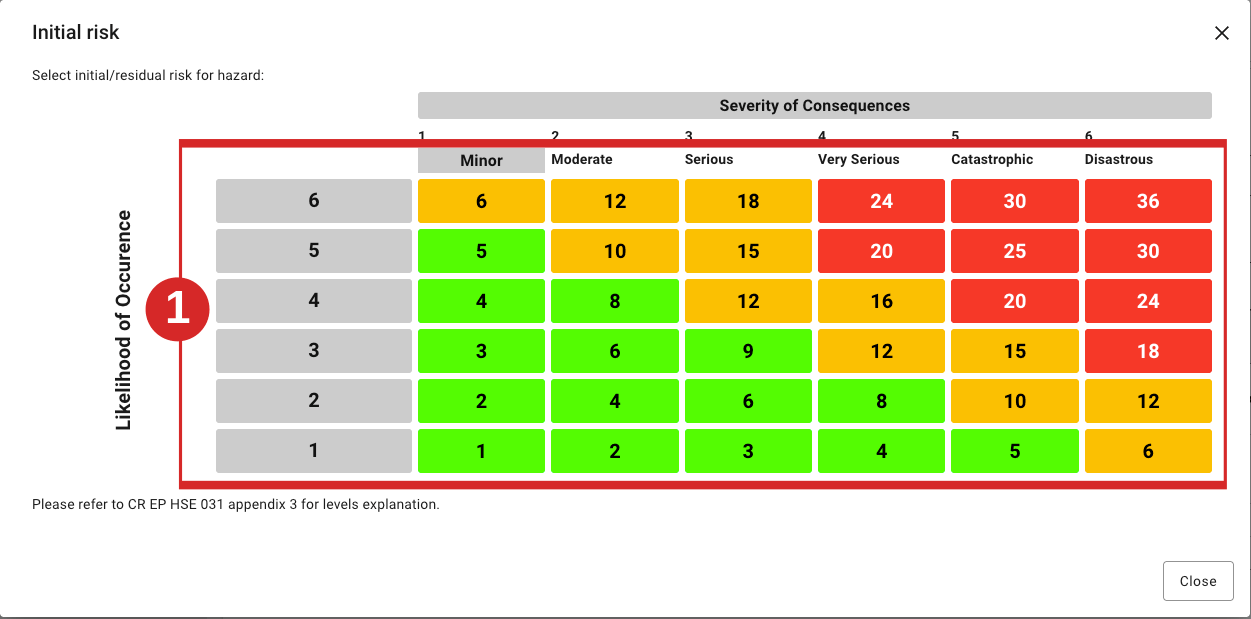
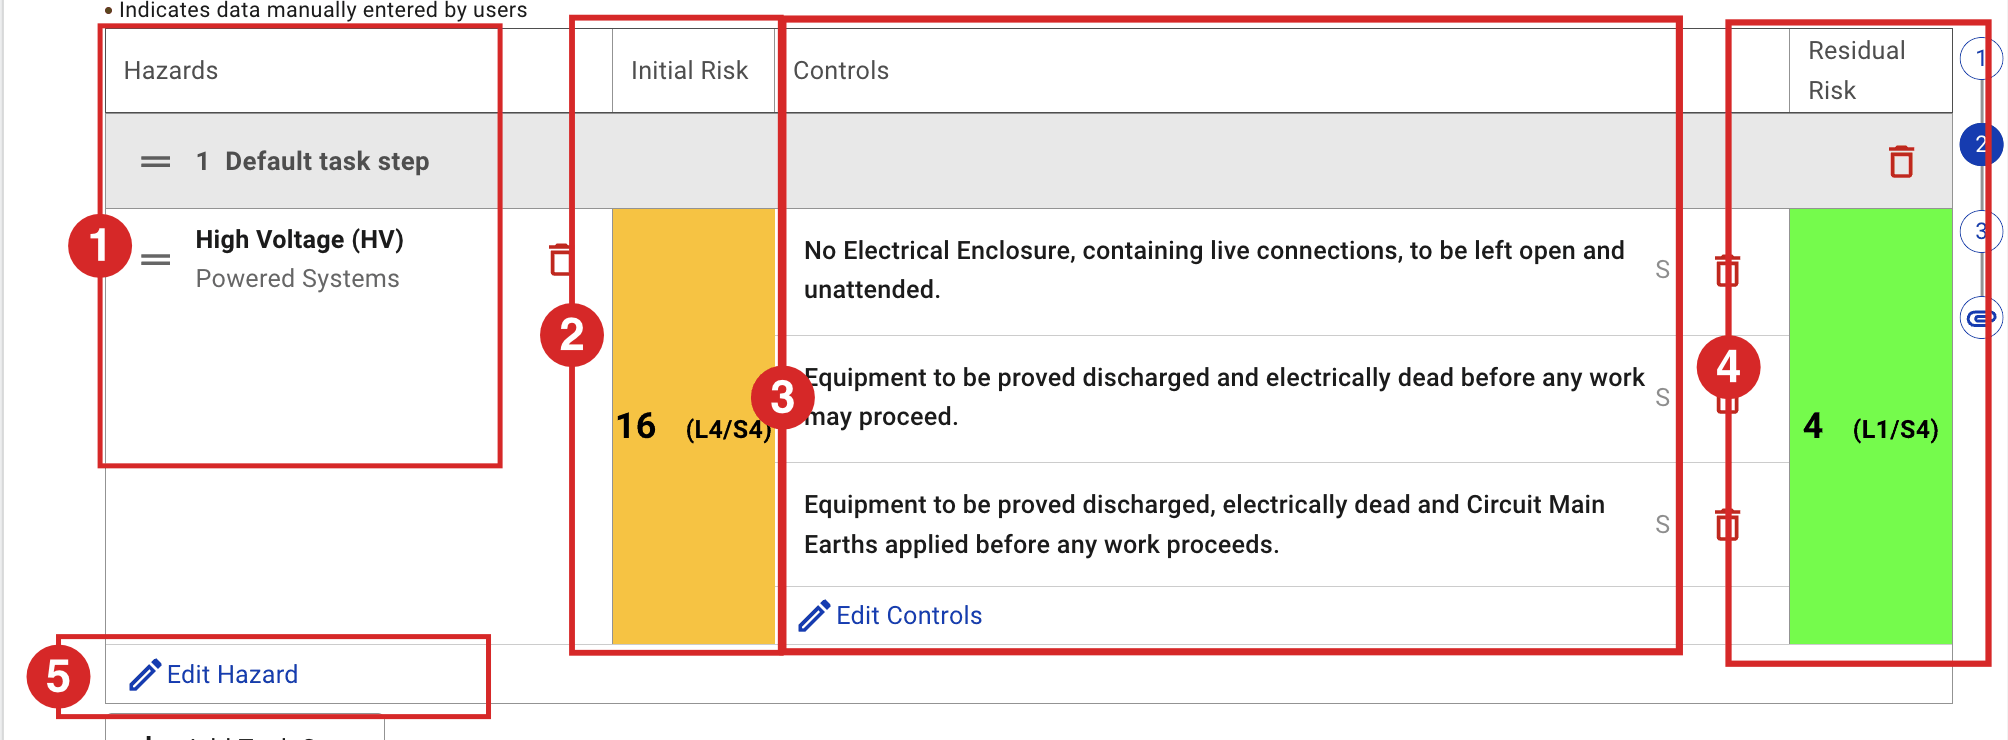
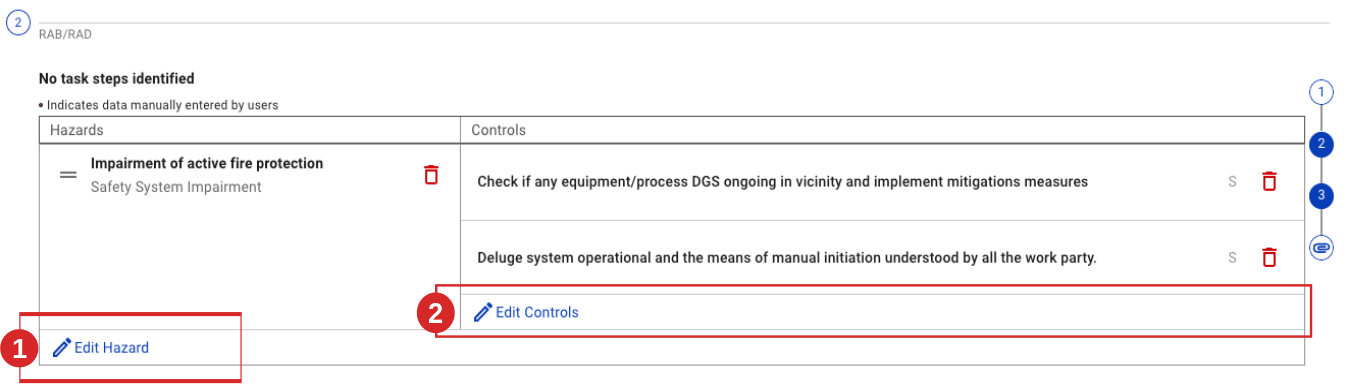
- Build the risk assessment: add a task step, select the hazards, then the controls. The hazard list is tailored per affiliate; if a hazard is missing you can add it manually. Each hazard must have at least one control. In a Detailed assessment you then score the Initial Risk and Residual Risk on the risk matrix (Likelihood × Severity); a Basic assessment lists hazards and controls only. When a control is marked as a prerequisite (P), the PCA and the OA Representative must later confirm the prerequisite has been done (at issue / opening).
- If a certificate is required, attach it before signing — see Attach an Isolation Certificate (ICC), Attach an Inhibit Certificate (INH), Attach an Operational Risk Assessment (ORA) or Attach a Complementary Certificate. ⚠ If the ICC/INH requirement was set to Full, the matching certificate must be attached here — otherwise the request signature is blocked. Conversely, if a certificate is attached, the requirement must be Full.
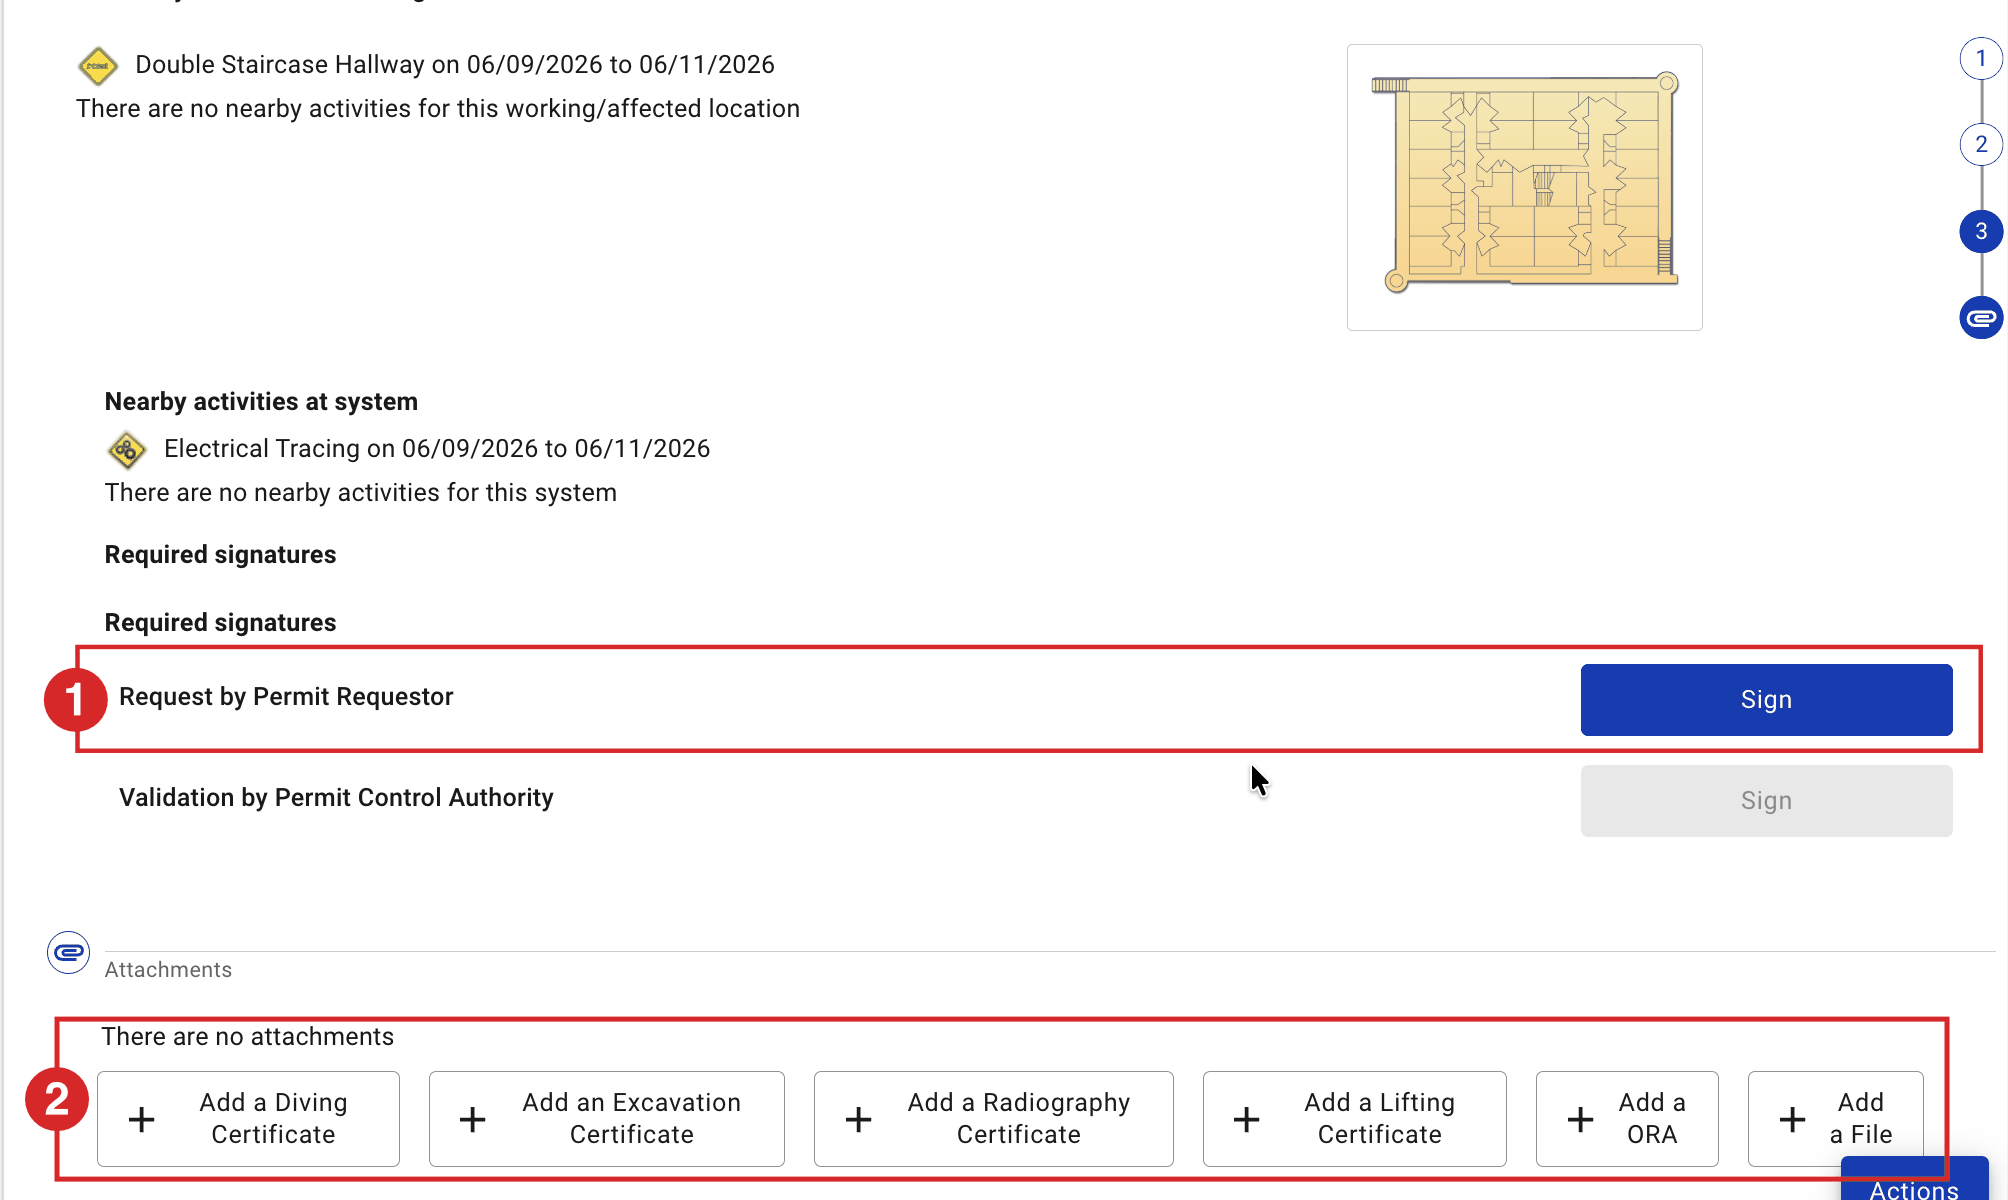
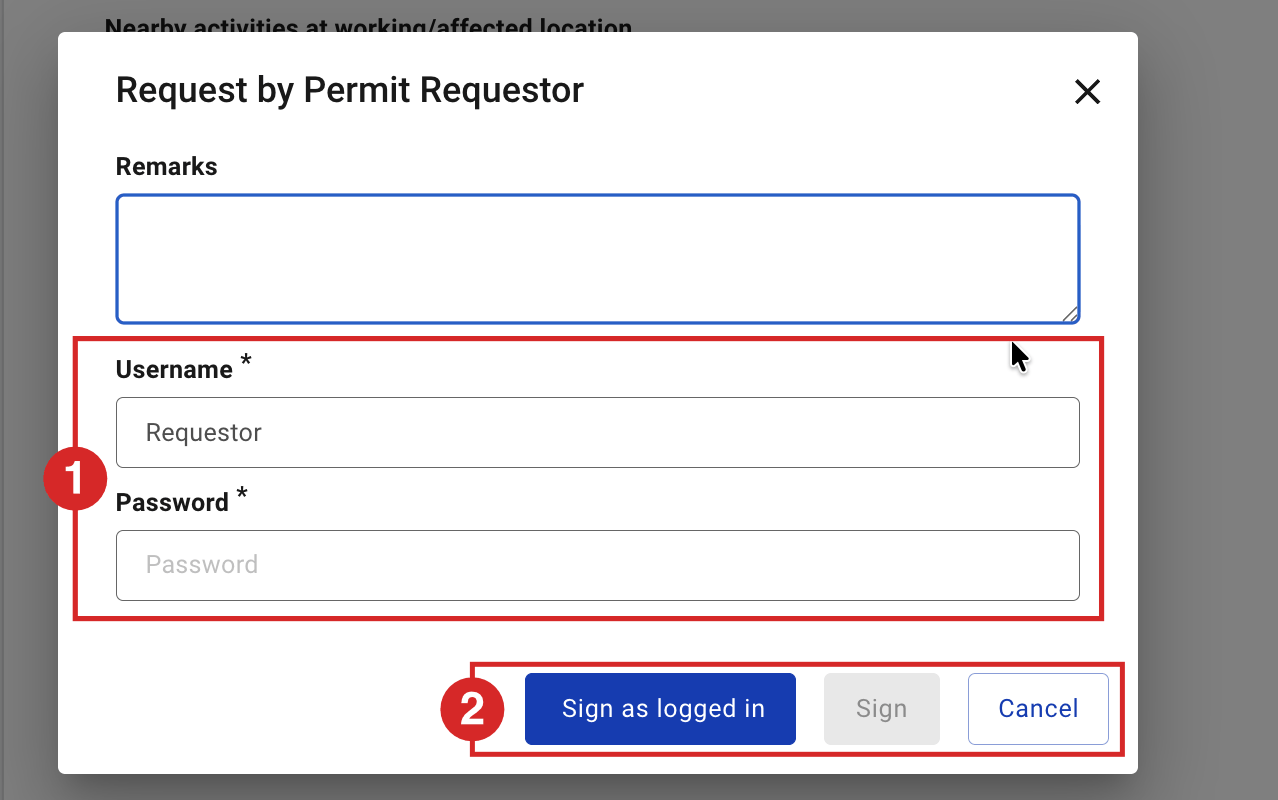
- Under Required signatures, click Sign on Request by Permit Requestor. Add remarks if needed, then confirm with Sign as logged in (signing on your own device) or Sign (shared device — enter your username and password).
Expected result
The permit moves from Request to Awaiting Validation and appears in the Permit Control Authority’s validation list.  The next task is Validate a Permit.
Key Referentiel rules
- A permit to work is based on a risk analysis. The analysis identifies the hazards, defines the control and emergency measures, and assigns who applies them. (CR-GR-HSE-402, Req 3.2.1)
- High-risk work (minimum list in CR-GR-HSE-402 Appendix 5: hot work with naked flame, lifting, work at height, excavation, confined spaces, high-pressure jets, work on powered systems, radiography, diving, flare network, asbestos, etc.) requires a joint site visit by the approving and performing authorities. A Detailed risk assessment is strongly recommended for this work. (CR-GR-HSE-402, Req 3.2.2)
- A person cannot approve or issue a permit to work for themselves. Keep a clear separation of duties between requester, approver and issuer. (CR-GR-HSE-402, executive summary)
Tips & pitfalls
Tip — reassess current conditions. A copied or routine-based assessment is never a substitute for checking the real, current work conditions on site.
Pitfall — controls missing. You cannot submit the request until every identified hazard has at least one control. Add the missing control rather than removing the hazard.
Pitfall — wrong assessment depth. For high-risk work, a Basic assessment is usually not enough. Use Detailed, and consider a JRA (a separate process) where required.
Pitfall — Site and Type are locked after saving. Check them before you save; they cannot be changed afterwards. The Type also drives the permit's validity duration — see Permit validity periods.
Tip — Work Order is becoming a key link. Work Order Number is optional today, but it is set to become the crucial data link for the permit (the source of linked data). Fill it even for maintenance work so permits are ready when the link goes live. (Wider deployment of this link is planned outside the current UAT — TO BE CONFIRMED.)
Tip — naming convention (recommended). Follow your site governance if you have one; otherwise the recommended naming convention below applies:
- Title — include the work location; start with ALL AREAS for generic permits, OVER BOARD / OVERBOARD for overboard work, WP when linked to a Work Pack, ROUTINE PERMIT for a routine template, OPP (and tick Shutdown) for an opportunity permit.
- Description of work — add a tag: /PI/ or /MI/ (process / mechanical isolation), /EI/ (electrical isolation), /INH/ (inhibition), /CSE/ (confined space entry), SCAFF (scaffolding).
- Work location — drives the Graphic View; for a generic permit put ALL AREAS in the title and select a single work location (the LQ HELIDECK location is dedicated to all-areas permits).
Common mistakes
| Mistake | Consequence |
|---|---|
| Choosing Basic for high-risk work | Hazards under-assessed; permit may be reverted or rejected at validation |
| Forgetting to set ICC/INH requirement to Yes | The permit progresses without the isolation/inhibit it needs; unsafe work conditions |
| Submitting with a hazard that has no control | The request signature is blocked; time lost |
| Vague description of work or location | Validator cannot confirm the scope; permit reverted for correction |